Setup – Jenkins and Windows
Overview
So, my team was recently assigned to help another team with their product. This product is built on the Microsoft world of C# and Silverlight. With C# being my home language and the platform of choice for a lot of people out there because it is so extremely powerful I wanted to see how hard it would be to use some of the tools we’ve been using on the other projects. This meant installing and running Jenkins on windows to do a pull of the source code hosted in Team Foundation Server and running a build on the solution as well as some unit tests. So in light of this background I’ll be explaining how to setup Jenkins. I’ll be going into installing Jenkins as a Master Build Server as well as how to set it up to run as a Slave to my Ubuntu Jenkins Build Server. Seeing that I’ve been working on more open source type of stuff and enjoying it so much I decided that I would like to use the toolsets that we’ve been using on those projects to help us maintain the same visibility on the Microsoft side of the world. So, what I’ll be going through are as follows:
- Pre-requisites
- Downloading Jenkins
- Installing Jenkins as a Windows Service
- Configuring Jenkins as a Master Build Server
- Configuring Jenkins as a Slave
- Creating a Job on the Slave
- Conclusion
If you want to see how I installed the Master Build Server on my Ubuntu environment you can have a look at my article called “Setup – Apache and Jenkins”. In this article I’ll be creating a Jenkins Slave to that Jenkins environment.
Pre-requisites
To run Jenkins on a Windows machine you’ll need to install the Java stuff. To do this you can follow the instructions as described on the Java site.
Downloading Jenkins
To download Jenkins you should go to their home page and grab their “Latest and greatest” war file.
Installing Jenkins as a Windows Service
In this section I’ll be explain how you could install Jenkins as a Windows Service. Of course you would be able to run Jenkins from the Command Line by opening a Command Prompt and browsing to the folder where you have your Jenkins.war file downloaded. I don’t like this because it’s dirty and because I’ll probably want to install it on a Build Server somewhere and for that reason you won’t have someone logged in all the time. To run it from the Command Line you can run the following command:
java -jar jenkins.war
This will extract the Jenkins files to a folder “.jenkins” under your User Account’s folder. Usually something like “C:\Users\[UserName]\.jenkins”. I don’t like this either so I would suggest setting up an Environment Variable called “JENKINS_HOME” to show to the place where you want Jenkins to run. In my case I want it to run under “E:\Software\Jenkins\.jenkins” so my Environment Variable will point to this folder and when I run the above command again Jenkins will look for this Environment Variable and automatically know to run there.
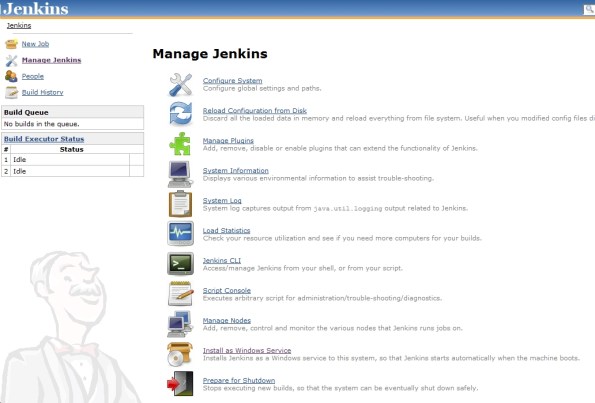
As mentioned above I don’t like running Jenkins from the Command Line and would prefer to have it run as a Windows Service that starts automatically when I start my Windows environment. To do this is quite simple. You should run the command above and then open up a browser and browse to your new running Jenkins’s home page at “http://localhost:8080”. Once there you should see a link for “Manage Jenkins” that looks like:
When you’ve selected this link it should come up with a page as follows:
In this list you should see a link called “Install as Windows Service”. When you click this link you should go to a page that looks like:
If you’re happy with the installation folder you should select “Install”, which should then take you to a page as follows:
This means that Jenkins is now installed as a Windows Service and you should see it under the Windows Service Manage as follows:
If you go back to your Jenkins site you should select the “Yes” button which will then stop your Jenkins running the Command Line and start the service for you. This completes the installation of Jenkins and you should be able to do everything you’ve come to enjoy playing with Jenkins on the Ubuntu installation.
Configuring Jenkins as a Master Build Server
If you’ve followed the steps in the previous section or in my article called ”Setup – Apache and Jenkins” you should have a Master up and running. I’ll cover how to set up a slave in my next section.
Configuring Jenkins as a Slave
In the case where you want to setup a Jenkins slave running on Windows, you’ll have to go through a few steps. These are not very hard, but it is quite hard trying to figure out how to do it. It was for me anyway, which is why I’m creating this article…
To start, open up your Master Jenkins home page in a browser. Once it’s loaded you should go to the “Manage Jenkins” page by clicking on the “Manage Jenkins” link as follows:
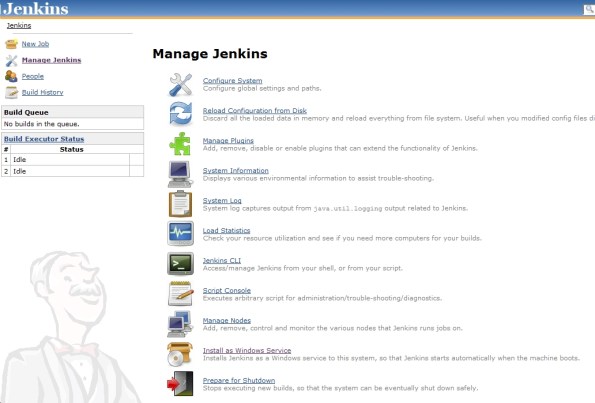
Once you get to the Manage page you should see something like:
In the list you should see the link called “Manage Nodes” as follows:
If you click on it you should be presented by a page that looks like:
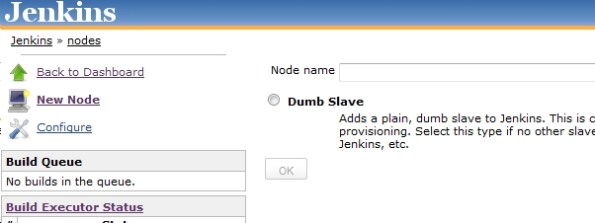
You should now select the “New Node” link. This will take you to a page that looks like:
On this page you should enter name that you want to call you Slave. In my case I called it “MySlave” and once that’s done you should select the “Dumb Slave” option and click on the OK button which should take you to a page that looks like:
Here you should select the options so your page looks like mine above. Once done click on the “Save” button, which should take you back to the “Manage Node” page. On this page you should now see your new Slave listed as below:
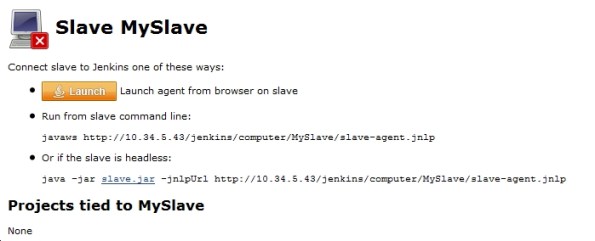
When you get to this page you should select your slave, which should take you to a page that looks like:
This is where it starts getting a little bit more interesting… If you click on the “Launch” button it should ask you to save a file to your local machine. This file is called “slave-agent.jnlp” and should be saved to the folder where you want to run your Slave. Once you’ve downloaded this file you should open a Command Prompt and browse to the folder where you downloaded the file to and run the command as follows:
javaws http://10.34.5.43/jenkins/computer/MySlave/slave-agent.jnlp
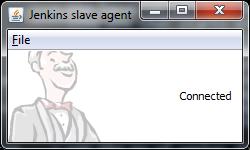
This should then bring up a window as follows:
On this window you should go to “File->Install as Windows Service”. This should bring up a message as follows:
In this case you should select the OK button, which will install the slave as a Windows Service. You should now get a screen as follows:
Click on the OK button so the service can be started. If you open up the Windows Services Manager you should now see a new Service there as follows:
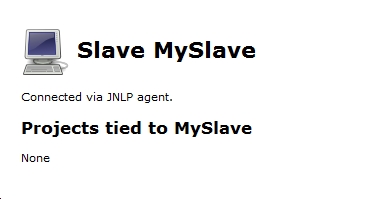
At this stage you should go back to your Jenkins site and refresh the page, which should then look like:
And that’s it; you’re done and now have a new Slave connected to your Master Build Server.
Creating a Job on the Slave
This works the same as for a normal Build Server with one little annoyance that you should be aware of. When you go into the “New Job” page you should see a Check Box as follows:
If you want your Job to only run on this Slave then you should enter your slave’s name in this box.
Conclusion
I hope this helps someone out there and makes it a bit easier for you to set up a Jenkins machine or slave on a Windows machine. Because Jenkins is written in Java you can run it on most environments and because of the way it works you can do Continuous Integration against any code base.










Thanks for sharing such good info on Jenkins, I love your blog 🙂
i have installed the jenkins but i want uninstall . how is it possible if any body know please help me. send the mail my email id
akyadavmca@yahoo.com
Hi Ajeet. I don’t know whether you managed to get it done yet, but you could simply uninstall the Jenkins service and delete the folder to uninstall it if you want.
I hope this helps, alternatively just let me know and I’ll go into more detail.
Thank you so much! This guide is really helpful.
thats really great
thanks this notes were helpful in setting up my windows slave with master running on linux
The process for setting up the windows slave is identical, regardless of where the master is running. It’s the power of Java!
i have installed jenkins on top of tomcat, and it is available in subdrectory JENKINS. by following steps I always get a message like URL was not found. I was thinking about relative paths. playing with it I get: java.io.FileNotFoundException: http://xxx/jnlpJars/remoting.jar ..I got same message even by changing in jnlp to this http://xxx/JENKINS/jnlpJars/remoting.jar
in the java error window I always see the wrong path.
could you help me?
thanks in advance for any info!
and I am able to run just as headless mode, but I dont know the difference. I was using that slave as standalone jenkins before, is there anyway to get all configured jobs into the server?
thanks again!
I was configured jenkins and integrated in my tomcat server but not able to start as the SVN repo path, mvn setting might be placed in wrong place, so can any body let me know where I’ll put all the project credentials in the UI ?
“Install as Window Service” link was not visible in Manager Jenkins folder which is showing in the UI, after we start tomct server http//localhost:8080/jenkins…
sir,
I want to setup jenkins for my project..plz guide me what steps i should follow to do this
iam very new to the jenkins but this is very flexible to read and understand and i tried and i succeeded in installing the jenkins.i dont have a tomcat in my local machine but still it is running . i dont have a clarity on that can u please give me the clarity on how its getting execute.
thank you,
Use bitnami solution stack for jenkins. Its a single setup file which does all the things automatically and Its easy to install:
http://bitnami.org/stack/jenkins
if you are configuring a JNLP slave, but for a different server (eg the master and the slave are on different systems), then you
1) setup the master (per above instructions)
2) setup slave per above, but when it is time to click the LAUNCH button, you must actually
a) on the slave system, log in as an admin account
b) open browser to your Jenkins server, and log in (if you have security in Jenkins setup)
c) Manage jenkins -> Manage Nodes -> and you should see
the LAUNCH button. Click it and run it.
when the little window appears saying it is connected, I found if I ever close it, my Jenkins server cannot see the slave. I tried setting up the windows service, but it did not work (and I have not investigated why (yet)).
Thanks you for this tutorial. I found this to be more helpful then the wiki for salve nodes.
Excuse me, for Windows slave nodes.
Worked great. I was trying, and getting close, to starting via SSH on Windows but this is much easier. thanks!
Thanks! This was a great tutorial.
One note to make would be that you dont need to install Jenkins on the slave computer.
I also found that when wanting to start the slave, you dont need to save the slave-agent file back on the master. Just run the jawaws command from the slave and it will work as desired.
Dear Blogger,
A very good day to you, i am just a beginner a first time to use / configure Continuous integration Server, have just configured Jenkins ver. 1.486 on windows server 2008 with simple Next Next instillation process. now its running on localhost:8080…Can you please tell me what to do next?.
Our requirements are to setup a build server for our current projects. It’s going to be a continuous integration server. It will compile, integrate, test, and package both desktop and web applications. It will build software developed using different technologies like .NET, Java, VC++, and other. We are thinking of using Jenkins (http://jenkins-ci.org/) as CI server and maven+ant for build scripts.
Your help in this regards will highly be appreciated.
Thank you.
Kaka
Woah this weblog is fantastic i like studying your articles. Keep up the good work! You understand, a lot of people are hunting around for this info, you can aid them greatly.
Hey Jaco,
Dankie vir die “tutorial”. Het dit geniet, en alles aan die werk gekry….
Its good Article for beginners …It helps lot for me
have you worked with selenium grid plug in
Not yet. Any good?