Jenkins – TFS and MSBuild
Introduction
In this article I’ll take you through the process of getting a Jenkins Slave running on Windows to pull the latest source code from Team Foundation Server (TFS) and then run an MSBuild on it. Once this is done, I’ll then take you through the process to get your Unit Tests running using both NUnit as well as MSTest tests. After we get the tests to build we’ll get PartCover to generate some Code Coverage reports.
Table of Contents
- Background
- Pre-Requisites
- Installing Plugins
- Jenkins Job Setup
- Overview
- Team Foundation Server (TFS)
- MSBuild
- Unit Tests
- MSTest
- NUnit
- Code Coverage Reports
- Overview
- Installing PartCover
- Installing CoverageReportGenerator
- Jenkins Code Coverage
- Conclusion
I hope the above will be sufficient to give you a good idea on how to use the Memory Queue.
Background
In my previous article called “Setup – Jenkins and Windows” I covered how to get Jenkins setup on a machine running Windows as well as how to setup a Windows slave that has an Ubuntu machine as a Master. The next thing I wanted to do was to connect to a Team Foundation Server Repository to get the latest version of my source code and run some Continuous Integration tasks on it. As I was doing some research on how exactly to get this to work I came across some things that I thought should be noted somewhere seeing that it wasn’t as simple as running these tasks as I thought it would be. The reason this is a bit more involved is because I’m running my slave on a Windows machine. So, here we are another article that contains the steps of how to get the above working. I hope someone out there find this useful. 🙂
Installing Plugins
Hudson Team Foundation Server Plug-in
Believe it or not there is a plug-in for connecting to a Team Foundation Server to get the latest version of your source code. To install this you should follow the steps as outlined in this section. Open up a browser and go to your Jenkins home page. Once you get there you should click on the “Manage Jenkins” link as follows:
![]()
This will load the Manage page that looks like:

On this page you should see a link called “Manage Plugins” as follow:

When you click this it should come up with a page that looks like:

You should select the “Available” tab in the list and look for a plugin in the list called “Hudson Team Foundation Server Plug-in”. Select it and scroll to the bottom of the page and select “Install”. This should install the plugin for you and you should be ready to start connecting to TFS.
Hudson MSBuild Plugin
Follow the same steps as in the previous section called “Hudson Team Foundation Server Plug-in”, but instead of searching for the TFS plugin you should now look for the plugin called “Hudson MSBuild Plugin”. You should select this plugin and click the install button.
Jenkins NUnit Plugin
Follow the same steps as in the previous section called “Hudson Team Foundation Server Plug-in”, but instead of searching for the TFS plugin you should now look for the plugin called “Jenkins NUnit Plugin”. You should select this plugin and click the install button.
Hudson MSTest Plugin
Follow the same steps as in the previous section called “Hudson Team Foundation Server Plug-in”, but instead of searching for the TFS plugin you should now look for the plugin called “Hudson MSTest Plugin”. You should select this plugin and click the install button.
HTML Publisher Plugin
Again you will have to follow the same initial steps as in the section above called “Hudson Team Foundation Server Plug-in”. Instead of searching for the TFS plugin you should now search for the plugin called “HTML Publisher Plugin”, select it and click the install button.
Jenkins Job Setup
Overview
In this section I’ll take you through the steps of connecting to you Source Repository situated inside Team Foundation Server and getting the latest version of your specific project. Once you have the latest version of the truth, you’ll execute a build step running MSBuild on your Windows Slave and then all the other lovely things necessary to complete this process… Before you start you should go through the following steps first…
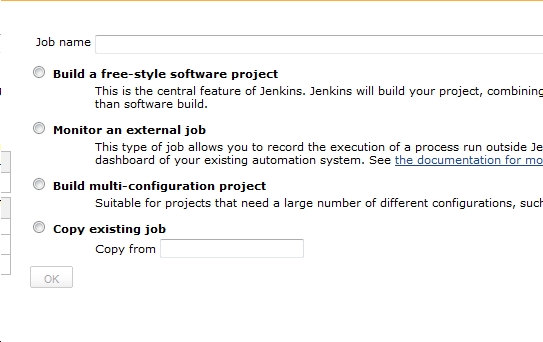
Go to the Jenkins home page where you’ll see a link for “New Job” as follows:
![]()
If you select this you should be presented by a page as follows:

As you can see I selected to name my Job “MySlaveJob” and selected to build a free-style software project. When you click the OK button it should take you to the Configure page that looks like:

On this page you should select the “Restrict where this project run” option as seen in the image above and type in the name of your Jenkins Slave on which you want this job to run. Once this is done you should follow the steps below to get latest version of the source code from TFS, running the Build etc.
Team Foundation Server (TFS)
To get the latest version of your source code from TFS, you should have installed the TFS Plugin by now which should give you an option under Source Code Management as seen below:

In this section you should select the Team Foundation Server option as seen above and type in the URL to your TFS system in the format of “[subdomain].[maindomain]”. In my case this is called “tfs.yakiloo.com”, but it all depends on how you set TFS up in your own domain. The same applies for the setting called “Team System Web Access URL” if you select the “Team System Web Access” from the “Repository Browser” dropdown. Of course you should give it a valid login name and password that is valid against TFS. Once this is all configured, your job should be able to get the latest version from Source Control.
To enable it to get the latest version when something changes you should set the following settings under the Build Triggers section:

Using these settings will poll TFS every 10 minutes to see if there are any changes to the source code and if there are changes it will pull the latest version. This completes this section and allows us to move onto the next section where we start doing our Build Step.
MSBuild
To build .Net application we would prefer to use the Build application that comes with .Net called MSBuild. To do this you should have installed the MSBuild plugin for Jenkins by now, so I’ll take you through the steps of setting it up inside the new Job that we set up in the previous sections. So, while you’re in the Job Configuration page, you should scroll to the section called “Build” where you should expand the “Add build step” dropdown and select the “Build a Visual Studio project or solution using MSBuild” option and configure it as show below:

You could pass in some Command Line Arguments as well if there are specific things you would like to configure for MSBuild. I usually do my builds by specifying the “/p:Configuration=Release” flags.
Unit Tests
MSTest
I’m assuming that you’ve installed the plugins necessary to publish the test results of your Unit Tests. In this section I’m going to set my Job up to run the tests that are part of my solution and then I’m going to publish the results to a place where it can be a bit more visible to the team and stakeholders or just those that care… To do this you have to change a few things in your Job Setup, so you’ll have to go back into your Job Configuration page.
To start with you need to add another build step. When you click on the “Add build step” drop down, you should see an option for “Execute Windows batch command”. Once this is done you should be able to type the following command into the “Command” text area:
del [PATHTOTESTRESULTSFILE]
mstest /testcontainer: [PATHTOTESTASSEMBLY] /resultsfile: [PATHTOTESTRESULTSFILE]
This deletes the tests results file and then runs the tests specified in the PATHTOTESTRESULTSFILE name. You could run multiple tests by specifying the /testcontainer flag more than once with a different assembly path for the tests. Once you’ve done this you should be able to publish the results by selecting the “Publish MSTest test result report” option.

Once selected you should fill in the same path to the test results file as the one you specified in the [PATHTOTESTRESULTSFILE] setting in the Command above. When you do a Build it should pass and your results should be published.
NUnit
This is more or less the same process as what you would follow for running MSTest tests. So, just to recap we’ll run the unit tests and once that’s done we’ll publish the results. To do this you’ll once again need to follow a few steps as before. First we’ll run the unit tests by clicking the “Add build step” drop down where you should select the option for “Execute Windows batch command”. Once this is done you should be able to type the following command into the “Command” text area:
del [PATHTOTESTRESULTSFILE]
[PATHTONUNITCONSOLE] [PATHTOTESTASSEMBLY]
You could run multiple tests by specifying more PATHTOTESTASSEMBLY files. Next you’ll want to configure Jenkins to publish your test results. To do this you should select the “Publish NUnit test result report” checkbox and type in the path to your test results as follows:
![]()
Once you’ve configured this you should be done and ready to move onto the next section of this article.
Code Coverage Reports
Overview
In this section we’re going to go into the generation of Code Coverage reports. I’ll show you again how to do this from Jenkins and how the publisher works. To complete this section I’m assuming that you’ve already installed the HTML Publisher Plugin. As part of this example I’ll take you through the publishing of Coverage Reports as generated by PartCover. I wanted to use NCover, but seeing that it’s not open source anymore I started doing some research on alternatives and came across PartCover, which seems to be a suitable replacement albeit slightly less intuitive. To get PartCover up and running and to convert the Coverage results it generates in XML format to HTML format I’ll be using a tool called ReportGenerator. So, let’s get these two items out of the way first.
Installing PartCover
Download PartCover by clicking on here or going to the Project Page here. Once downloaded you should install it and then copy all the files into your Project’s lib folder. I do this because I don’t like installing libraries on the build server.
Installing CoverageReportGenerator
To download this nifty little tool you should go to the Home Page and download it. Once downloaded you should unzip it into your lib folder so it becomes a part of your project again. Once this is done you’ll be able to generate Coverage Reports in HTML format.
Jenkins Code Coverage
Now that you have the necessary items installed you can adapt the following script to suit your own setup. It’s a very simple and straightforward batch script with some session environment variable that you should change to show your own setup. This will then run the unit tests, run PartCover to generate code coverage XML file and once completed it will generate a new folder called “CoverageReport” with the Code Coverage results in it. The script looks like this:
ECHO TOOLS
SET PROJECTHOMEPATH=HelloWorld
SET PartCoverConsolePath=%PROJECTHOMEPATH%\lib\PartCover
SET PartCoverConsoleName=PartCover.exe
SET NUnitPath=%PROJECTHOMEPATH%\lib\NUnit\nunit-console-x86.exe
SET REPORTGENERATORPATH=%PROJECTHOMEPATH%\lib\ReportGenerator\bin\ReportGenerator.exe
ECHO ASSEMBLIES TO TEST
SET ASSEMBLYPATH=%PROJECTHOMEPATH%\HelloWorldNUnit\bin\Release
SET TESTASSEMBLY=HelloWorldNUnit.dll
ECHO GENERATED FILES
SET HTMLPATH=%PROJECTHOMEPATH%\CoverageReport
SET LOGPATH=%PROJECTHOMEPATH%\Coverage.log
SET COVERAGEPATH=%PROJECTHOMEPATH%\Coverage.xml
DEL /Q %HTMLPATH%
%PartCoverConsolePath%\%PartCoverConsoleName% –register –target %NUnitPath% –target-args %ASSEMBLYPATH%\%TESTASSEMBLY% –include [*]* –output %COVERAGEPATH%
%REPORTGENERATORPATH% %COVERAGEPATH% %HTMLPATH%
Once you got your environment to build inside Jenkins by running this batch command you can publish the HTML results by selecting the “Publish HTML reports” checkbox and filling in the details as follows:
Once you’ve run your build the first time you should now see the “Code Coverage Report” Report title in your Project as shown in this image:

If you click on this link you should see something like:

You should play with the command line to generate the Code Coverage a little bit to get rid of the Coverage being done on NUnit itself, but at least you now have a nice open source manner of doing this. This report allows you to drill down and can be customized to show in the way that you want it to show as well. I found this combination to work quite well and will stick to it, even though I’m still learning how to use PartCover itself.
Conclusion
I hope this article will help someone out there to achieve this nice integrated Continuous Integration environment for their .Net projects as well. C# and the .Net framework is my favourite platform even though I like working on other environments as well. I’ve come to realize that the more environments and frameworks you know then better you’ll do in your own. I suppose that knowledge is power and without the knowledge you will make uninformed decisions…
Anyway, enjoy and have fun…

Great article, wish I saw it sooner 🙂 I’ve been struggeling with the MSTest and Jenkins runtime variables not being recognized. I dont want/cant have my test results overwritten so my windows batch cmd looks like this: /resultsfile:TestResults\%JOB_NAME%-%BUILD_NUMBER%-Testresults.trx has this switch. and that works fine. But in the value ‘Test report TRX file’ nothing similar seems to work and the build always fails therefore. Do you know if this be achieved?
Hi Phillip,
Not sure what you mean. What runtime variables are you talking about? In my instance I had to create Environment Variables that point to the install path of Microsoft.Net and the Microsoft TFS folder. Once that was done I added these new variables to my Path, which allowed me to call the M$ executables I needed to run my builds and tests.
If you have more information around what you want to do and your current setup I’m sure I’ll be able to reproduce it on my side and come up with a solution for your problem 🙂
I’m talking about the Post Build Action ‘Publish MSTest test result report’ on the Job Configuration page, provided by JUnit Attachments Plugin. Sorry for the confusion there.
This attaches the trx result file to the build in the JUnit format. But I’m not able to dynamically refer to the test report afterwards(MSTest outputs TestResults\%JOB_NAME%-%BUILD_NUMBER%-Testresults.trx on each Test run). None of the built-in variables seem to work. I can only enter the exact path like Testresults\MyTestResult.trx to pick up a result file.
Hi Phillip,
Sorry for only getting back to you on this now. I’ve been on a bit of a holiday. As for your question, I have no idea. I would have to play with it to get it to work. If you’ve found a way to do that in the meantime then please write a response to this explaining how you got it to work. I’m sure there will be some other guys out there with the same question 🙂
Hey
amazing article, it helped a lot!!!
I only have one question, I wanted to start with a batch command an .exe file with nunit-console in jenkins, but at every start an unhandled exception occured but I don’t know why, do you have any ideas?
If I start the .exe file in the cmd I have no problems.
“C:\Program Files (x86)\NUnit 2.5.10\bin\net-2.0\nunit-console-x86.exe” “.exe-file”
Could that be a problem with jenkins? FYI the .exe file is a Ranorex File
thanks in advance
regards Claudia
Hi Claudia,
Thanks for the feedback 🙂 As for your question, have you tried putting the NUnit files in a lib folder under your source control project and pulling it from source and running it under the Jenkins work-space for the project? I’ve found that this is a better option seeing that it excludes all the deviation that might exist between my different build servers and it’s more deterministic in terms of which version of my added components and libraries are used with my different projects.
So, to make this easy, I would suggest you put the following files in a “lib” folder under your project in source control and then running your tests with these NUnit files to see if this resolves your issues:
nunit-agent-x86.exe
nunit-agent-x86.exe.config
nunit-console-runner.dll
nunit-console-x86.exe
nunit-console-x86.exe.config
nunit.core.dll
nunit.core.interfaces.dll
nunit.framework.dll
nunit.util.dll
If this doesn’t help, please let me know and I’ll see if I can help you 🙂 Good luck and enjoy 🙂
Hey,
thanks for the fast answer.
I found the problem already. Jenkins was running as a Windows Service on my Server and hasn’t the authorization to start a GUI application.
I startet Jenkins now with the command java -jar jenkins.war and it works now.
thankt you
best regards
Claudia
Hi,
I’m glad you got it working. Enjoy 🙂
Hallo,
Why Jenkins is used for pulling source?.
Does it mean that, MSBuild does not have in built support for pulling source code from repositories?
Please clarify.
Regards,
Malik
MSBuild is a builder
In this case :
Jenkins can be considered as an UI that launch ‘pull code from SCM’ task and then launch ‘build the code’ task (build which is performed by MSBuild for .Net project)
Hi,
nice post.
I’m getting a Status Code: 404 when clicking on the code coverage report link. The report folder was generated with the code coverage, I opened it, the ‘html directory’ parameter is right, but somehow Jenkins is not showing the reports.
Any ideas what’s going on? I appreciate any help.
Regards,
Daniel Lobo
Never mind, never mind! 😀
My bad, I overlooked the html file, is index.HTM and not index.HTML .
Could you post your actual [PathSolution] in Jenkins-MSBuild configuration?
MSBuild Jenkins Plug-in keeps giving errors of either not seeing files or project solution, although it execute nicely when I run from command line.
Thanks
Thanks, will this process work for Java projects using maven 3? TFS and jenkins?
Hi Ketan,
With the Maven plugin in Jenkins, you can essentially do anything you can do in direct Maven.
do I have to install jenkins on the same server as TFS or can it be on my local machine ?
I am running into several issues so just making sure.
thanks
Hi Nish,
You don’t need to do that. TFS has some excellent APIs and the integration plugin for Jenkins works very well.